 Client: Zoic
Project: Once Upon A Time, The Stranger Episode
When Zoic approached Fusion CI Studios to create a very challenging stormy ocean sequence for ABC’s Once Upon A Time, The Stranger episode, there were a lot of excited fluids artists here in the house! We love ocean work and even the rigorous demands of a tv schedule couldn’t dissuade anyone from jumping on board.
The final scene: http://www.fusioncis.com/press/OceanSceneHD_ONC_mos.mov
The episode received both an Emmy and a VES award nomination, so it’s a great example of how near film quality fx work is penetrating series tv. In the sequence, Gepetto and Pinocchio attempt to navigate stormy ocean waters while stalked by Monstro, a giant whale. This kind of sequence would be out of reach for many studios, but Zoic is no stranger to doling out high quality VFX on crazy episodic tv schedules, having built a pipeline around the extreme demands of series television. And Fusion, with its extensive experience with fluid fx on any scale and schedule, has a well-developed suite of tools and methods for creating oceanic fluid fx – honing its expertise on films like:
The Guardian http://www.fusioncis.com/projects/film/guardian/
The Curious Case of Benjamin Button http://www.fusioncis.com/press/benbutton/CuriousCaseofBenjButton_TugSubBattle_halfHD.mov
As well as a vast array of commercial & installation projects needing ocean fx.
As a team, Fusion and Zoic were perfectly suited to pumping out this sequence.
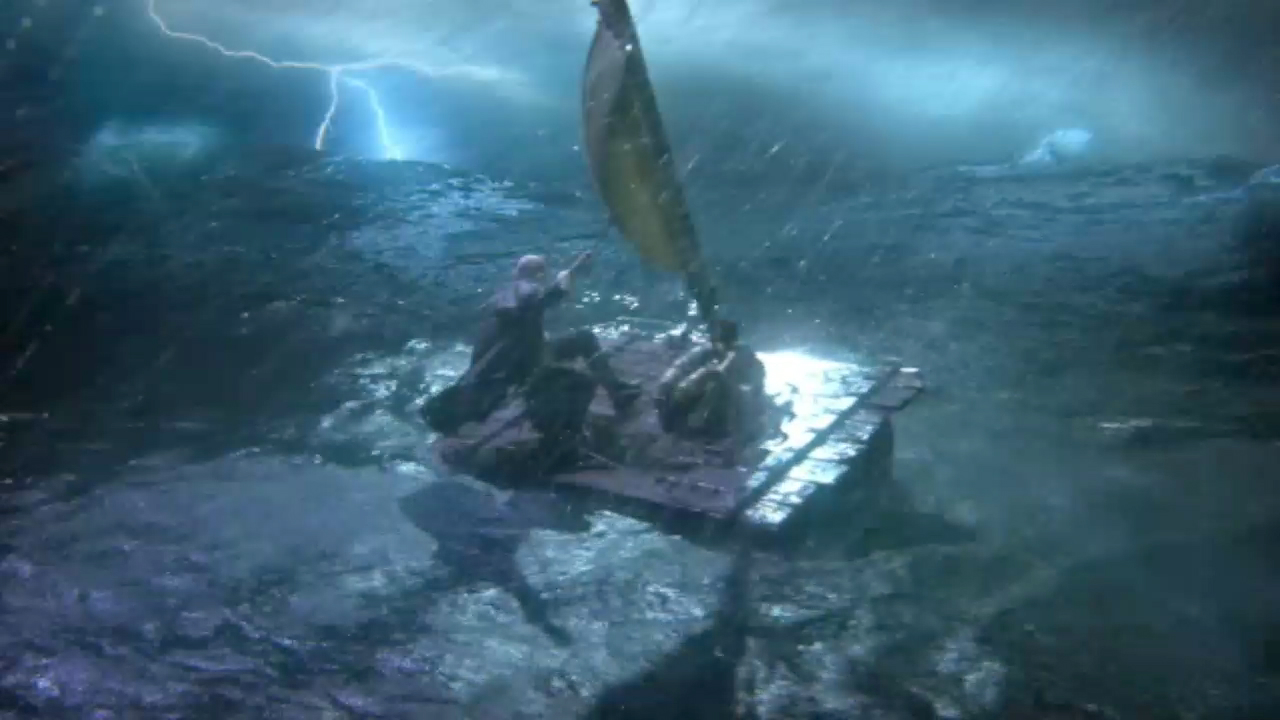 A real Gepetto on a real raft in a wave tank. The ocean surface tight to the raft is practical, with cg water beyond that.
Not all the effects were CG. The real Gepetto spent what must’ve been an arduous shoot, standing on a raft in a small wave tank, being buffetted by fans, water sprays and the occasional bucket-full of water. The practical fx gave Zoic real water in the immediate vicinity and in contact with the raft, and interacting with Gepetto. Even tho the wave tank’s surface did not approach the stormy character that was needed for the finished shot, it created a small patch of high detail reality around the raft and meant that Fusion wouldn’t need to create that water. This of course meant that Zoic’s compositing department had to blend together the wave tank surface near the raft with the more turbulent CG ocean surface.
Ok, let’s have a look at how some of the cg fluid fx were put together. We’ll also highlight how the project was managed, which is a big part of how these kinds of fx could be completed on schedule.
Ocean Surface Assets
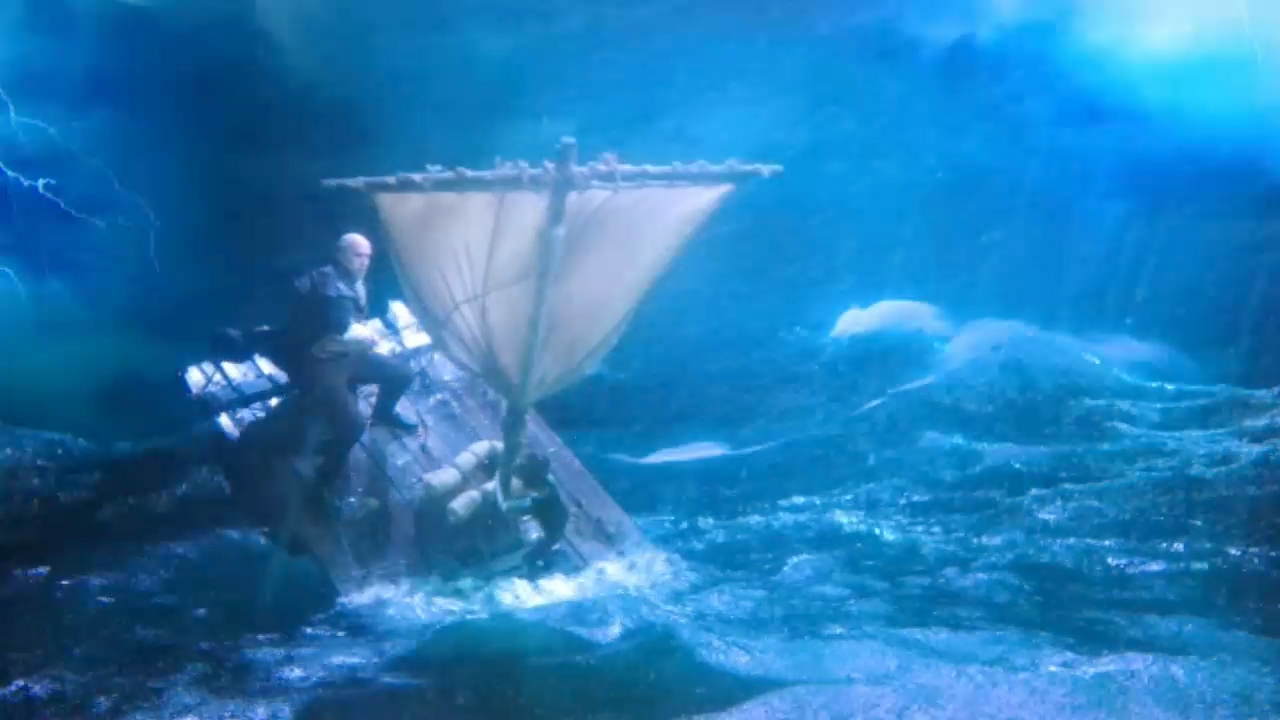 While the Zoic team refined the animation of the giant CG whale, Fusion focused on working up a stormy ocean surface. The first decision to be made was that Fusion would create a single re-useable or “generic” ocean surface that could tile into the distance as needed for a particular shot, so that Zoic could use and re-use the surface for whatever shot in the sequence made it to the locked edit. In order to do this, the team had to commit to leaving out any true physical interaction between the ocean surface and the raft or the whale, in order to avoid having to generate a custom surface for each shot. By “interaction”, we mean ripple-type wave generation on the surface generated by interaction with geometry. This was a solid decision for efficiency but also safe from the physics perspective because if you watch real objects at the surface in stormy conditions there’s almost always very little visible interaction of this kind, and most of what you see are things like splashes and waterline foam — both of which could be generated on an as-needed basis using Fusion’s ocean fx tools on a generic ocean surface. In practice this also meant that the Zoic team took care with camera and geometry placement to avoid seeing waterline contacts so the whole topic of interaction could be neatly side-stepped. This is the kind of team decision that really helps move a project forward and avoids repetitive and costly looping back into the production pipeline for negligible gain in the final visuals.
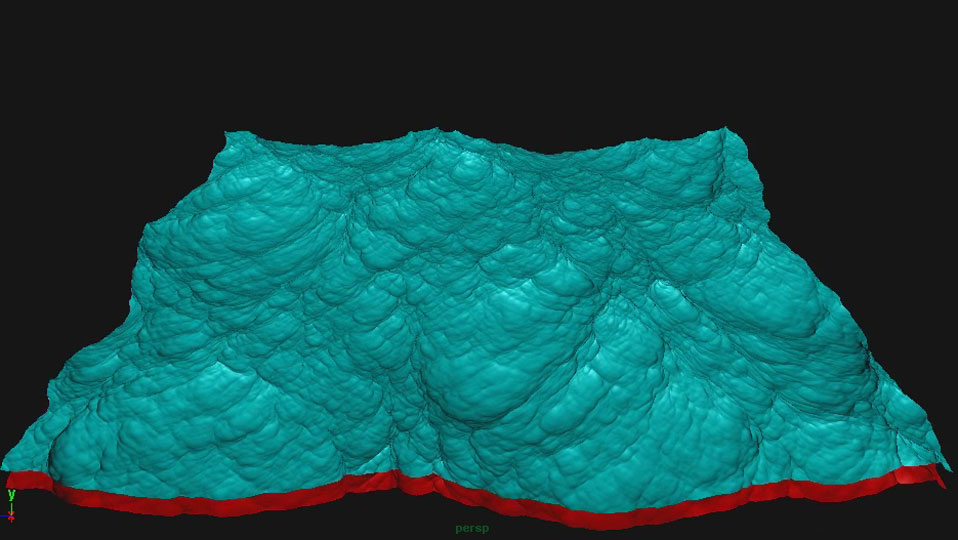 A single tile of the CG ocean surface used throughout the sequence.
Fusion’s team set about building an ocean surface that would meet the needs of the shots, making it menacing and “sharp” and heaving, with lots of detail at the 10-cm wavelength and including towering ocean swells and a lot of horizontal displacement, but not so crazy that it would make Zoic’s animation and camera work nightmarish. For this we used RealFlow’s RealWave system, which for these kinds of shots is extremely effective and allows you to generate a surface that is art-directable, highly detailed, fast to sim, and tiles seamlessly so you can create wide ocean shots easily. The team decided to shorten the ocean swell wavelengths to enhance the steepness of the ocean and make it move more rapidly, which for the low camera angles in most of the shots would still look natural. Zoic’s creative director Andrew Orloff then signed off on the look of the surface — here’s a playblast showing a single tile:
[hana-flv-player video=”http://fusioncis.com/wp-content/uploads/2013/04/oceansurface_06a1.flv” width=”640″ description=”” player=”5″ autoload=”true” autoplay=”false” loop=”false” autorewind=”true” /]
And here’s render of a small collection of tiles, with simple physically-based lighting and a cloudy sky background dropped in, showing that the tiles can form a large expanse of ocean:
[hana-flv-player video=”http://fusioncis.com/wp-content/uploads/2013/04/oceansurface_LtgTest1.flv” width=”640″ description=”” player=”5″ autoload=”true” autoplay=”false” loop=”false” autorewind=”true” /]
The approval of the ocean surface kicked off another flurry of activity with Zoic’s animators placing cameras and CG raft and whale on the surface to meet the story’s needs, while Fusion’s team set about creating a number of whitewater hero wave crests to dress up the surface, making it even more scary and realistic and providing an opportunity for some custom interaction with geometry such as a wave “hit” on the raft in the opening shot.
 A few hero wave crests on the ocean surface tile.
The hero wave crests were generated using a rig that Fusion’s VFX Supervisor Mark Stasiuk built for previous ocean work, although for this project it was updated to automate some of the rig setup and implement Fusion’s Smorganic tool (http://www.fusioncis.com/pr_smorganic.html) to help fill out the fluid volume. The wave crest rig is conceptually simple and designed to create open (deep) ocean breaking waves rather than coastal (shallow) surfer-style breaking waves. Deep ocean wave crests are more like wind-triggered collapses of water from steep wave tops, and behave much like avalanches of snow. The rig consists of a source emitter that follows tightly in behind a wave crest, shooting at it’s lee slope just beind the high point of the wave. The fluid from this emitter is actually set to not interact with the wave surface, instead going right thru and hitting a piece of guiding geometry just below the surface. On contact with the guiding geo, the fluid is switched to another emitter which represents the actual whitewater, and bounces off the guiding geo to emerge from the wave as wave crest fluid. By adjusting things like the emission speed of the source emitter, angle of the guiding geo and a variety of scripted controls to enhance different components of the wave crest fluid’s velocity on creation, we can go a long way to controlling the look of the wave crest. The setup is built this way to give the user a maximum amount of art direction control, since we found that just letting the fluid do it’s own thing rarely satisfies a director’s vision and these wave crests are typically a big part of the storytelling in particular shots — such as the opening shot where the camera moves in on the raft just as it is hit by a wave crest.
Getting a wave crest to behave itself perfectly naturally for a given ocean surface is a tweaky thing and can be quite time consuming, especially if the wave shape is very sharp and rapidly changing with time. This tweaky nature is often the down side of making an effect very art directable. The most tweaky part is the moment when the wave crest initiates, where it tends to look a little too much like fluid is simply jetting out of the wave surface, altho immediately after emerging the crests look quite natural:
[hana-flv-player video=”http://fusioncis.com/wp-content/uploads/2013/04/oceansurfWavecrest_BoatView1.flv” width=”640″ description=”” player=”5″ autoload=”true” autoplay=”false” loop=”false” autorewind=”true” /]
And the wave crest fluid also had the advantage of forming quite realistic surface foam patches after the emission part of the cresting behavior ended, as you can see in this top view playblast:
[hana-flv-player video=”http://fusioncis.com/wp-content/uploads/2013/04/oceansurfWavecrest_TopView.flv” width=”640″ description=”” player=”5″ autoload=”true” autoplay=”false” loop=”false” autorewind=”true” /]
Here the team again made a smart decision since there was no shot where we needed to show any foreground cresting activity as it initiates. When used in the background and with lots of stormy atmosphere applied in comp, the cresting elements looked fine so their slightly unnatural startup wasn’t an issue there either. This again allowed things to move forward quickly, avoiding spending a lot of time tweaking simulations just for a good look in the first 15 frames of a 150 frame sim.
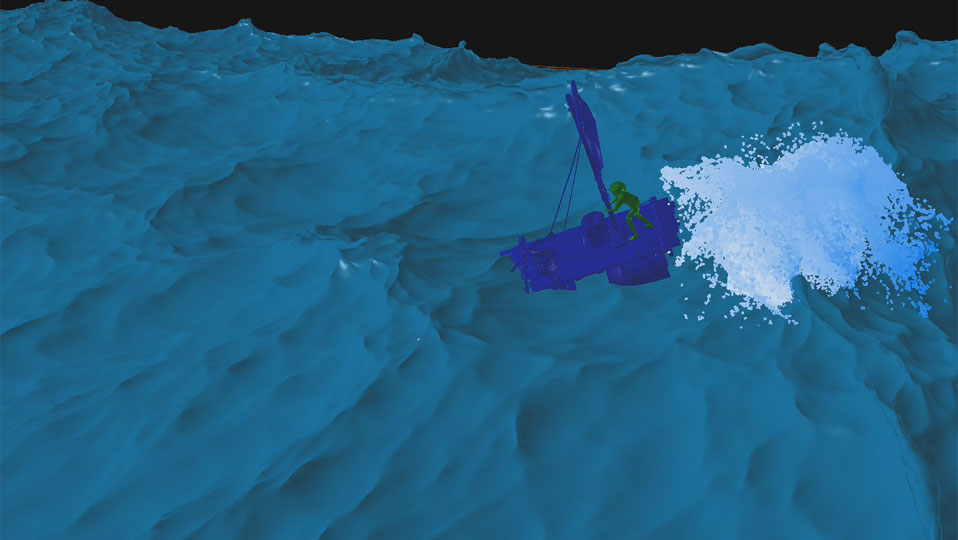 A custom wave crest, designed to hit the raft with a specific timing, direction and shape
A little more care had to be applied to the custom wave crest in the opening shot, since it was not only very visible in the shot but also important to the story. For this, Zoic first placed the raft in the general position on the ocean surface and indicated which wave should crest and hit the raft:
[hana-flv-player video=”http://fusioncis.com/wp-content/uploads/2013/04/pinsplash_oceanPlacement1.flv” width=”640″ description=”” player=”5″ autoload=”true” autoplay=”false” loop=”false” autorewind=”true” /]
Then while Zoic’s team refined the raft and character animation, Fusion worked up a low res wave crest sim for prelim comments — initial results like this being used for timing and size comments but otherwise looking distinctly unimpressive to anybody not familiar with fluid simulations:
[hana-flv-player video=”http://fusioncis.com/wp-content/uploads/2013/04/PinSplashLoRes1.flv” width=”640″ description=”” player=”5″ autoload=”true” autoplay=”false” loop=”false” autorewind=”true” /]
But after a few tweaks and turning up the detail level / particle count (the fluid resolution), that sim above becomes much more appealing:
[hana-flv-player video=”http://fusioncis.com/wp-content/uploads/2013/04/PinSplashFinal1.flv” width=”640″ description=”” player=”5″ autoload=”true” autoplay=”false” loop=”false” autorewind=”true” /]
Soaking Pinocchio
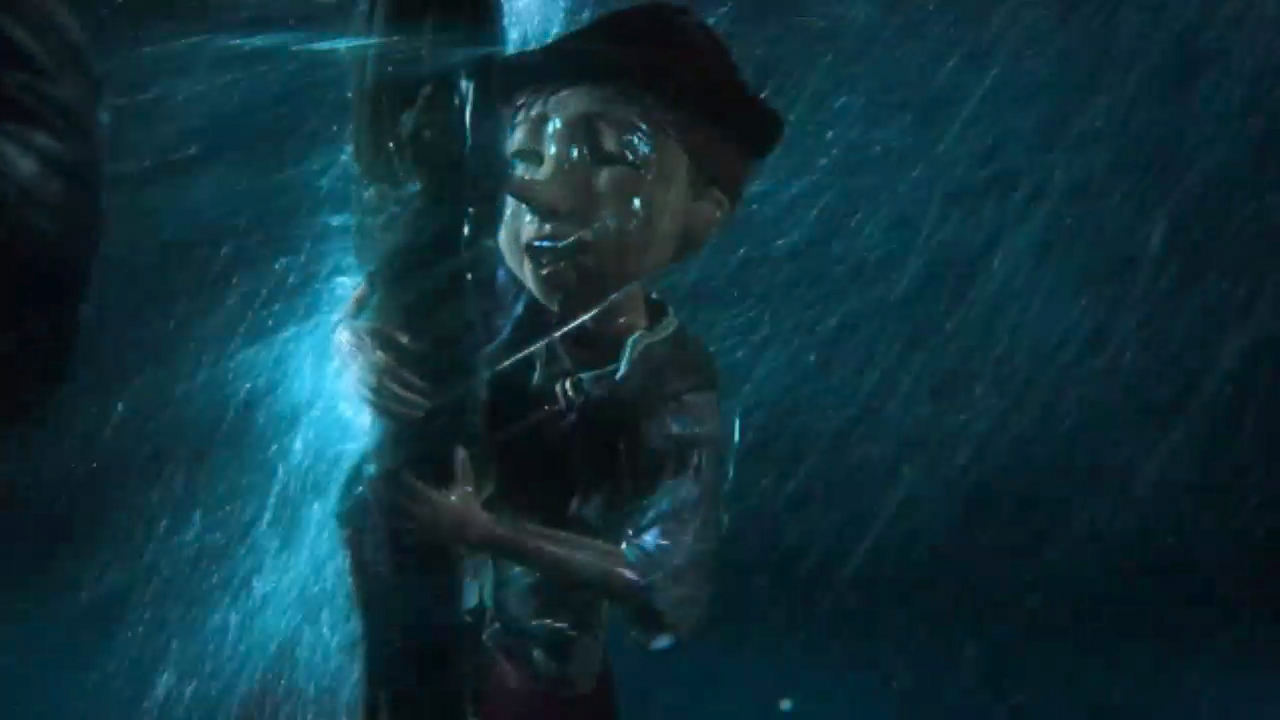 One drenched CG Pinocchio, complete with CG water streaming off him and a mix of cg & practical “rain”.
In a close-up shot showing the CG Pinocchio on the raft, Zoic planned to comp in practical rain and spray elements — having gotten lots of footage while blasting poor old Gepetto on set — but they needed to make Pinocchio really feel like he was in the driving rain of a storm. That is, the CG character had to get really wet. For this task, the Fusion team was able to use an in-house “streaming” tool, used to make fluid either stream off surfaces or simply wet them, but without having to actually throw fluid at them in the first place. Prior to developing the tool we had done lots of wetting of objects by jetting / splashing / spraying but it was never controllable enough and we always found we were simming a lot more water than we really needed. That becomes time consuming and expensive.
So we developed a tool that distributes fluid as evenly as desired onto a painted-on poly selection, allowing artists to control exactly where an object gets wet, allowing for art direction at the same time as avoiding problematic locations where the character’s geo interpenetrates and produces ugly fluid behavior. As the fluid is generated, it inherits as much of the motion of the geometry as desired to give a really nice physical “lock” into the motion of Pinocchio, and that plus a little wind gives Pinocchio a major soaker. By wetting geometry this way, we not only get a lot of control on the look but also don’t need to generate any sort of environmental sim like falling rain, which wasn’t needed anyway so would’ve been a waste of time (and money).
This tool also includes smorganic, so as the fluid splashes or is blown off Pinocchio it can form stringy shapes that snap apart into droplets. An early version on temp character animation shows how this looks more like gooey drool when smorganic is turned up too high (oops!):
[hana-flv-player video=”http://fusioncis.com/wp-content/uploads/2013/04/PinDrips_06a1.flv” width=”640″ description=”” player=”5″ autoload=”true” autoplay=”false” loop=”false” autorewind=”true” /]
But once the setting is tuned-up it generates a very natural looking dripping water effect, seen here on final animation:
[hana-flv-player video=”http://fusioncis.com/wp-content/uploads/2013/04/PinDrips_18a1.flv” width=”640″ description=”” player=”5″ autoload=”true” autoplay=”false” loop=”false” autorewind=”true” /]
Selling a Whale
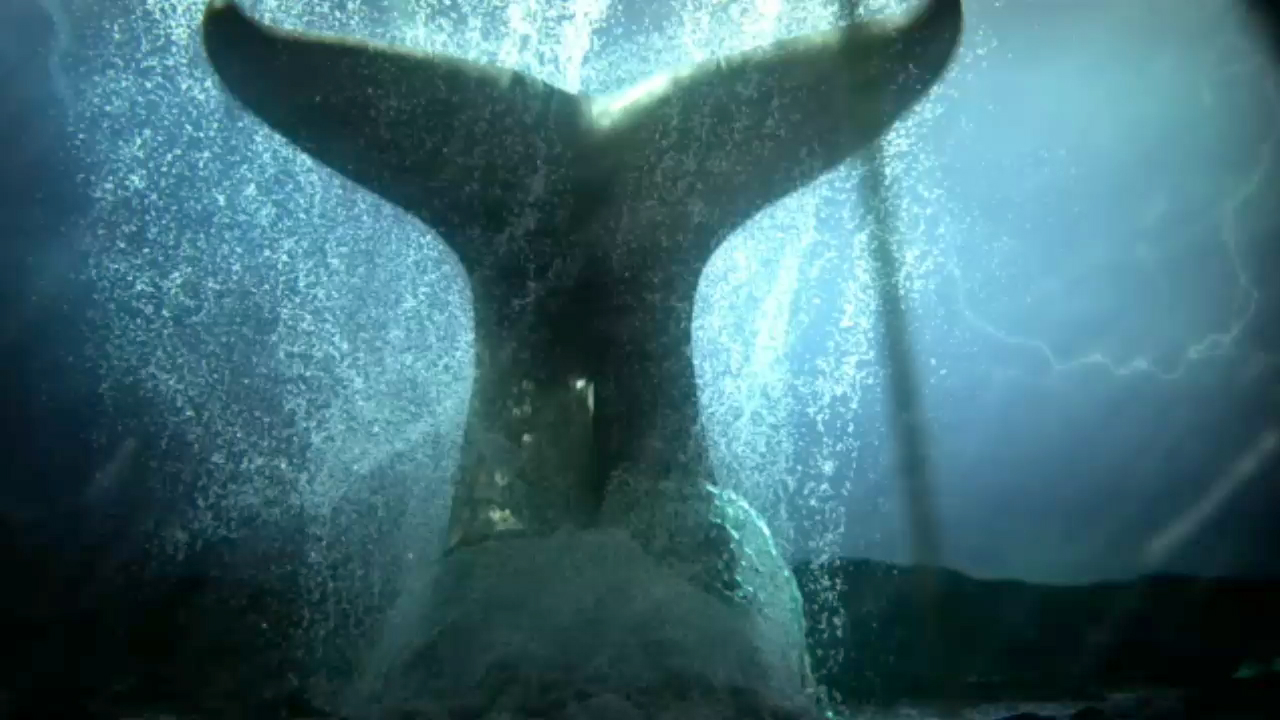 Monstro’s tail flipping up as he dives. Numerous CG water elements were added to give enough detail / scale to sell Monstro’s huge size.
In this sequence the hero element is clearly Monstro the whale, a massively large character that had to feel like it was displacing some serious water not only to look like it was interacting with the ocean surface (which it wasn’t), but also to give it the right sense of scale — and scariness. In fluid fx, you can approximately equate scale with detail — a little splash of water is generally simpler in form than a giant splash. So making Monstro feel big and powerful meant pouring on the water in a big way.
There were 3 main shots where Monstro is the star, and for each of these Fusion applied a combination of a splash setup similar to the wave crest rig described above, and also used the streaming tool extensively.
In shot 7, we see Monstro’s tail flip up and slide down as he dives below the surface, a classic whale movement. For this shot we really had to work the water elements: since there was no other spatial reference for scale, the water and ocean surface were the only way to tell that Monstro is monstrous. To do this Fusion generated the water in 3 parts: streaming water off the tail geo, a splash around the base of the tail as it drives forward, and a splash off the end of the tail as it flips up. Key to the look was keeping gravity fairly low to reduce the descent speed of the water and give the illusion of great size. A single pass of the streaming water gave good results but wasn’t voluminous enough:
[hana-flv-player video=”http://fusioncis.com/wp-content/uploads/2013/04/whaletailstreaming07_single.flv” width=”640″ description=”” player=”5″ autoload=”true” autoplay=”false” loop=”false” autorewind=”true” /]
But once the gravity settings were tuned up we cranked out 3 passes of high res streaming sims to get some serious water volume:
[hana-flv-player video=”http://fusioncis.com/wp-content/uploads/2013/04/whaletailstreaming07_triple1.flv” width=”640″ description=”” player=”5″ autoload=”true” autoplay=”false” loop=”false” autorewind=”true” /]
And that along with the tail base and tail end splashes, and it feels like that’s one big whale. The particle counts were sufficiently high that playblasts of the action make it difficult to see what’s happening in detail:
[hana-flv-player video=”http://fusioncis.com/wp-content/uploads/2013/04/whaletail07_allfluid1.flv” width=”640″ description=”” player=”5″ autoload=”true” autoplay=”false” loop=”false” autorewind=”true” /]
The next Monstro shot (shot 12) was one where he does the classic shark-like “swim by”, to take a close look at his prey before pouncing. In this shot he surfaces and moves past camera, just behind the raft, and we see one of his huge eyes peering at Gepetto and Pinocchio.
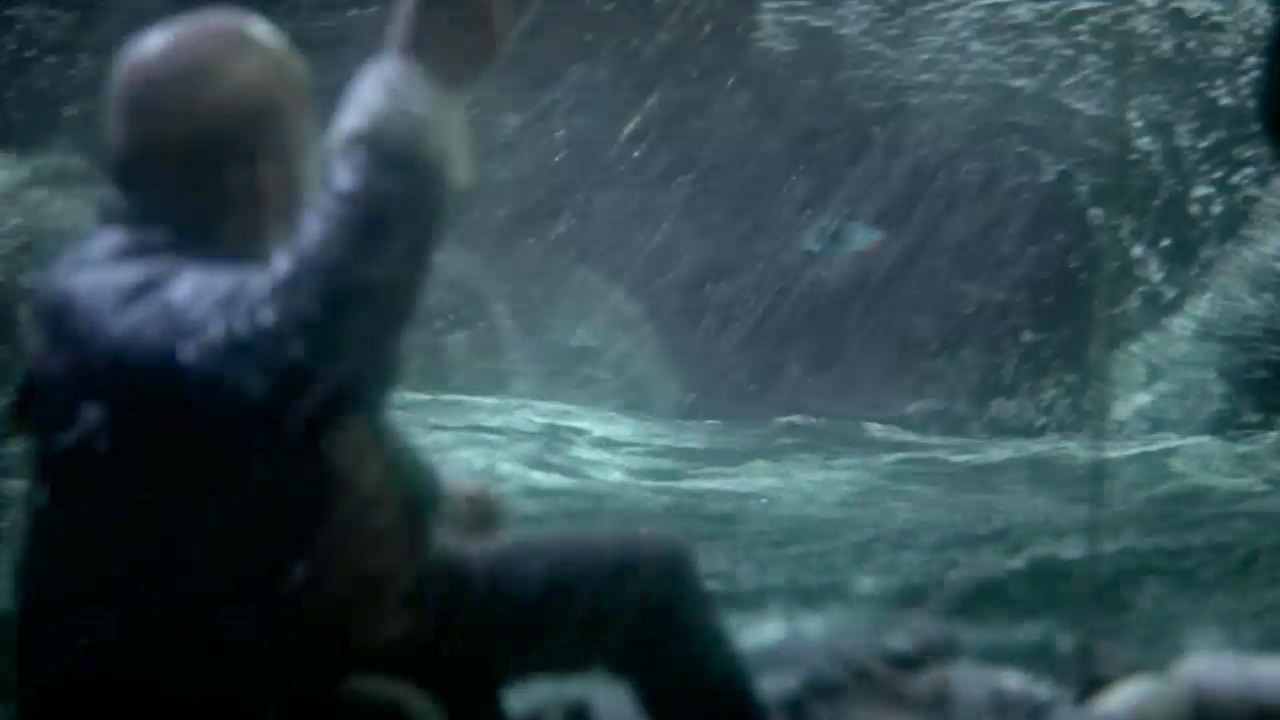 Monstro ‘spy-hops’ past Gepetto to take a close look at his prey.
The challenge here was just how close Monstro gets to camera, filling frame. So not only is he huge, but he’s really close — for cg water, this means a lot of detail and tight interaction with Monstro’s geometry. For this shot we adapted the streaming tool, adding in camera-dependent clipping so as Monstro’s geometry leaves view, the streaming fluid from that geometry shuts off. And, any fluid that leaves camera view gets killed off as well.
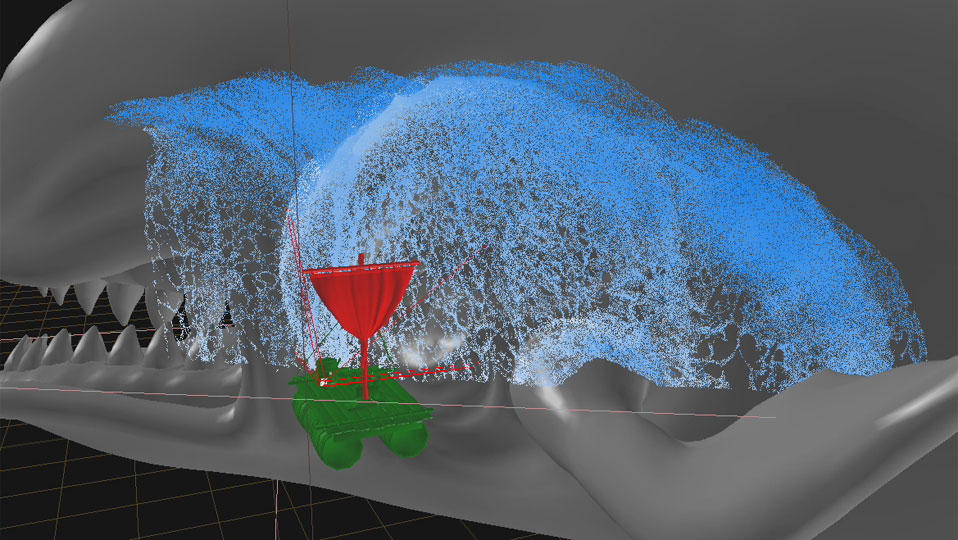 A perspective view of the streaming water on Monstro’s skin, showing how it was limited to what was in view.
We went to this trouble so we could put all our simmed fluid on screen instead of spending computational time simming hidden water. Unfortunately we did have to give the fluid some time prior to coming into view, since the nicest looking streaming action took a little time to develop as the fluid poured down Monstro’s surface. You can see in the playblasts run from other views, the sort of flow development taking place:
[hana-flv-player video=”http://fusioncis.com/wp-content/uploads/2013/04/whaleskinstreaming12_perspview1.flv” width=”640″ description=”” player=”5″ autoload=”true” autoplay=”false” loop=”false” autorewind=”true” /]
We quickly realized that a big part of what would be in shot was Monstro’s mouth, specifically his giant scary teeth, so we added some elements of streaming water coming off his teeth and gums to make it feel more like there was water gushing thru his mouth:
[hana-flv-player video=”http://fusioncis.com/wp-content/uploads/2013/04/whalemouthstreaming12_cam1.flv” width=”640″ description=”” player=”5″ autoload=”true” autoplay=”false” loop=”false” autorewind=”true” /]
And once all the elements were put toghether with the final animation, they looked like this:
[hana-flv-player video=”http://fusioncis.com/wp-content/uploads/2013/04/whalestreaming12_allfluid1.flv” width=”640″ description=”” player=”5″ autoload=”true” autoplay=”false” loop=”false” autorewind=”true” /]
In the final major shot with Monstro (shot 52), where he pounces on the raft, he makes an extremely fast move — which if you consider his size is truly extreme in its motion. This is a great example of where art direction has a big influence on fluid fx and how you have to be able to adapt to what’s needed in a shot, even if what’s happening isn’t really physically right.
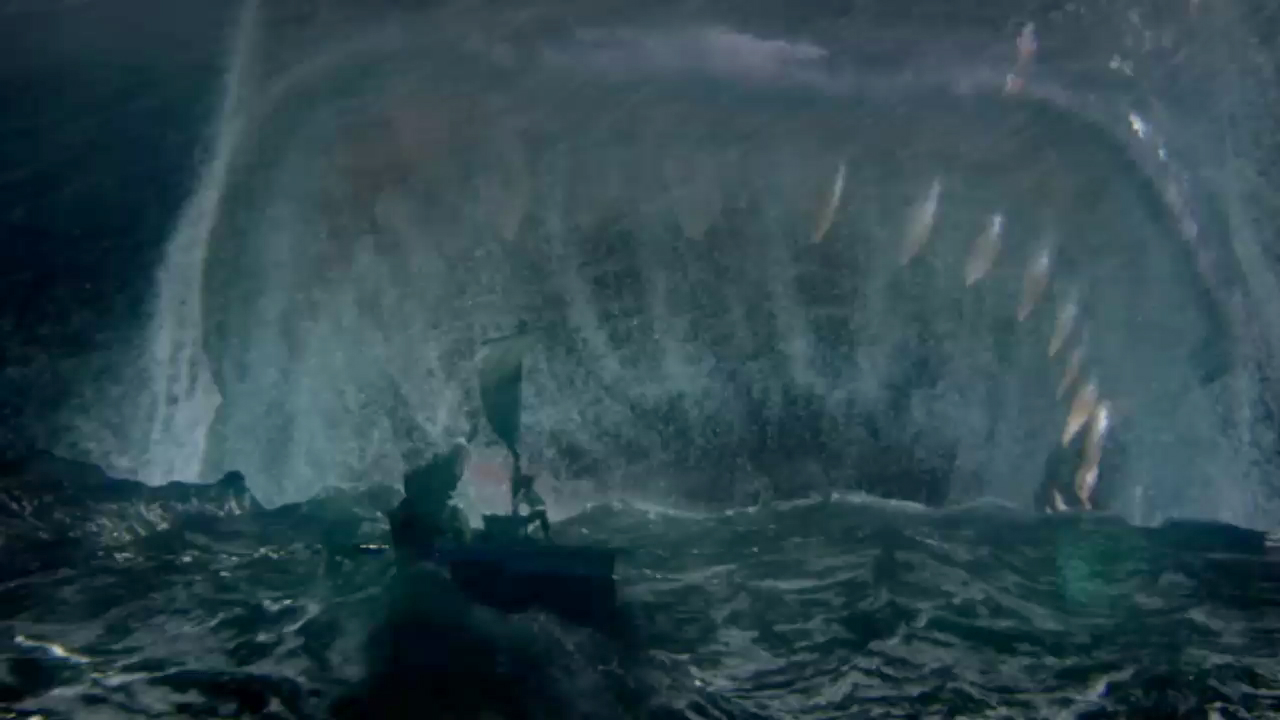 Monstro lunging at the raft, with tons of CG water streaming off him.
You can see the extreme motion of Monstro in this perspective view (not from the shot camera), where you also see a set of our streaming water elements coming off his teeth and gums:
[hana-flv-player video=”http://fusioncis.com/wp-content/uploads/2013/04/whale52_mouthstream_perspview1.flv” width=”640″ description=”” player=”5″ autoload=”true” autoplay=”false” loop=”false” autorewind=”true” /]
Had we generated elements that were more physically realistic, we’d have not only generated such vigorous splashes and spray as to conceal Monstro from camera but also totally swamp out the raft before Monstro ever got to it. Instead we toned down the splashing and spray activity and pushed all the elements back over Monstro’s geo to avoid it splashing forward onto the raft.
For splashes around his waterline, especially at his leading edge where he bulldozes thru the water toward the raft, we used a splash rig which is an adaptation of our hero wave crest rig. In this case we use an array of emitters (green fluid in the low-res sim playblast below), and on contact with Monstro’s geo the fluid is switched to a “splash emitter”, which is the actual splash that is later rendered. This is a great rig for customized, high volume splashes, altho it does require animating the array of emitters to follow the geo. The advantage tho, is that you don’t have to sim a giant pool of fluid around the character, and you get tremendous control on the look of the splashes:
[hana-flv-player video=”http://fusioncis.com/wp-content/uploads/2013/04/whale52_splash_LoRes1.flv” width=”640″ description=”” player=”5″ autoload=”true” autoplay=”false” loop=”false” autorewind=”true” /]
After turning up the fluid resolution and adding in a pass of spray, we get the playblast below, now from the shot camera:
[hana-flv-player video=”http://fusioncis.com/wp-content/uploads/2013/04/whale52_splashspray_cam.flv” width=”640″ description=”” player=”5″ autoload=”true” autoplay=”false” loop=”false” autorewind=”true” /]
After making some final adjustments to the splash elements and generating streaming fluid off Monstro’s head, we get this final playblast where we’ve set the particle size to be really tiny so you can see a bit more of what’s going on:
High-End VFX for Episodics
The fluid fx on this episode are a great example of how tough, high end vfx can be done on an episodic schedule. Just 2 or 3 years ago we would never have tried this — but as our tools have improved, and studios like Zoic have gained experience and built a better episodic-capable pipeline, it has become…. well, definitely not easy, but at least not something that makes you question your sanity.
It’s important though, to keep in mind that you still can’t dive into this kind of project without solid backing. Our tools have been developed and evolved over years of project work, so there were very few technical unknowns. Zoic’s pipeline is similarly tested, so there’s no lack of hardware or people resources there to handle the wide range of CG tasks like camera tracking, roto, matchmoving, modeling, animation, texturing, lighting, rendering and compositing. We’re laying all this out there to appreciate what’s involved in this stuff, since it’s easy to get overly focused on just your little piece of the machine. If you don’t have this kind of muscle to back you up, it’s important to not take on these kinds of projects or you run some serious risks.
The final component we didn’t mention is just as important as the other parts: project management. The success of the work reflected smart decisions on the part of the project’s creative and management team to simplify on less visually important aspects — such as leaving out interaction between CG characters and the ocean surface — and also maintain a disciplined schedule of client approvals on components of the work. Character modeling and animation was accelerated and client approvals were won very early in the production schedule, so there were little to no changes in models and animation after the time Fusion got to work on the fluids. This meant that Fusion’s artists were working with final or very nearly final animations and cameras almost from day 1, preventing wasteful looping back in the fx pipeline from late stage animation changes, and optimizing the results on screen.
Congratulations to the Zoic team on a fantastic job!